The End of the WISHGHAN CAL – Week #15 Blocking, Connecting, and Crocheting the Final Border
Borders Around Each Square / Rectangle
At this point you should make a single crochet (SC) border around each of the squares. This will make it much easier to connect the squares once we’ve reached that stage.
You have two choices here:
- You could use the background color of each square in order to create the border.
- You can try to match whatever colors are hitting the edge of the square doing color changes along the way.
Option #2 is the one that I chose to do because it gives a cleaner look, but I won’t lie… it will take you longer since you’re adding color changes into the mix. Totally up to you!

The way you will want to crochet the border is to start in the side of one of the squares, preferably where you will have a long chunk of one color. Grab your size H hook that you used to make each square and your yarn and begin with a slipknot on your hook.
- (Sc in each pixel square side, Sc in space between pixels) around the straight edges. For the corner pixel squares, you want to do 2sc on one side of square and 1sc in the other side of the square for a total of 3sc in the corner squares.
I show this technique at the end of the Dogghan Week 1 and 2 videos on Ink & Stitches YouTube. Here’s the link to Cup o’ Chihuahua Tea. Fast forward to the end of the video:
Time to Block!
If you’ve never blocked your crocheted work before, it’s incredibly easy! Just takes drying time.
At this point, you should have the crocheted border around each square. I have a handy dandy block of wood with nail holes drilled in every inch or so. I’ve seen others use foam mats thick enough to hold pins, like the ABC foam mats that fit together like a puzzle for kids.
- Wet the front and back of your square with a squirt bottle.
- Stretch squares to be roughly the size of your biggest square. For mine, this meant a 12”x12” square block. Rectangles will be different depending on their size. The ivy borders are long and slender, whereas Cricket: Covered in Hair is the size of three squares put together.
- Pin in place to a wooden or foam board (or anything that you have that could hold pins to pin your work in place). For my type of board, I just slipped the outer Sc edge onto the pins that were already pushed into the board. Use as many pins as you need so that your work stays straight edged.

**You can pin a couple squares at a time if your pins are tall enough. Saves a bit of time.
- Allow to dry completely at stretched width.
- Repeat with all squares/rectangles. For the longer rectangles, you may need to get creative. As you can see here, I stretched the Whimsy square using multiple boards and folded the square in half, pinning it as though it were two separate rectangles.
Connect the Squares!
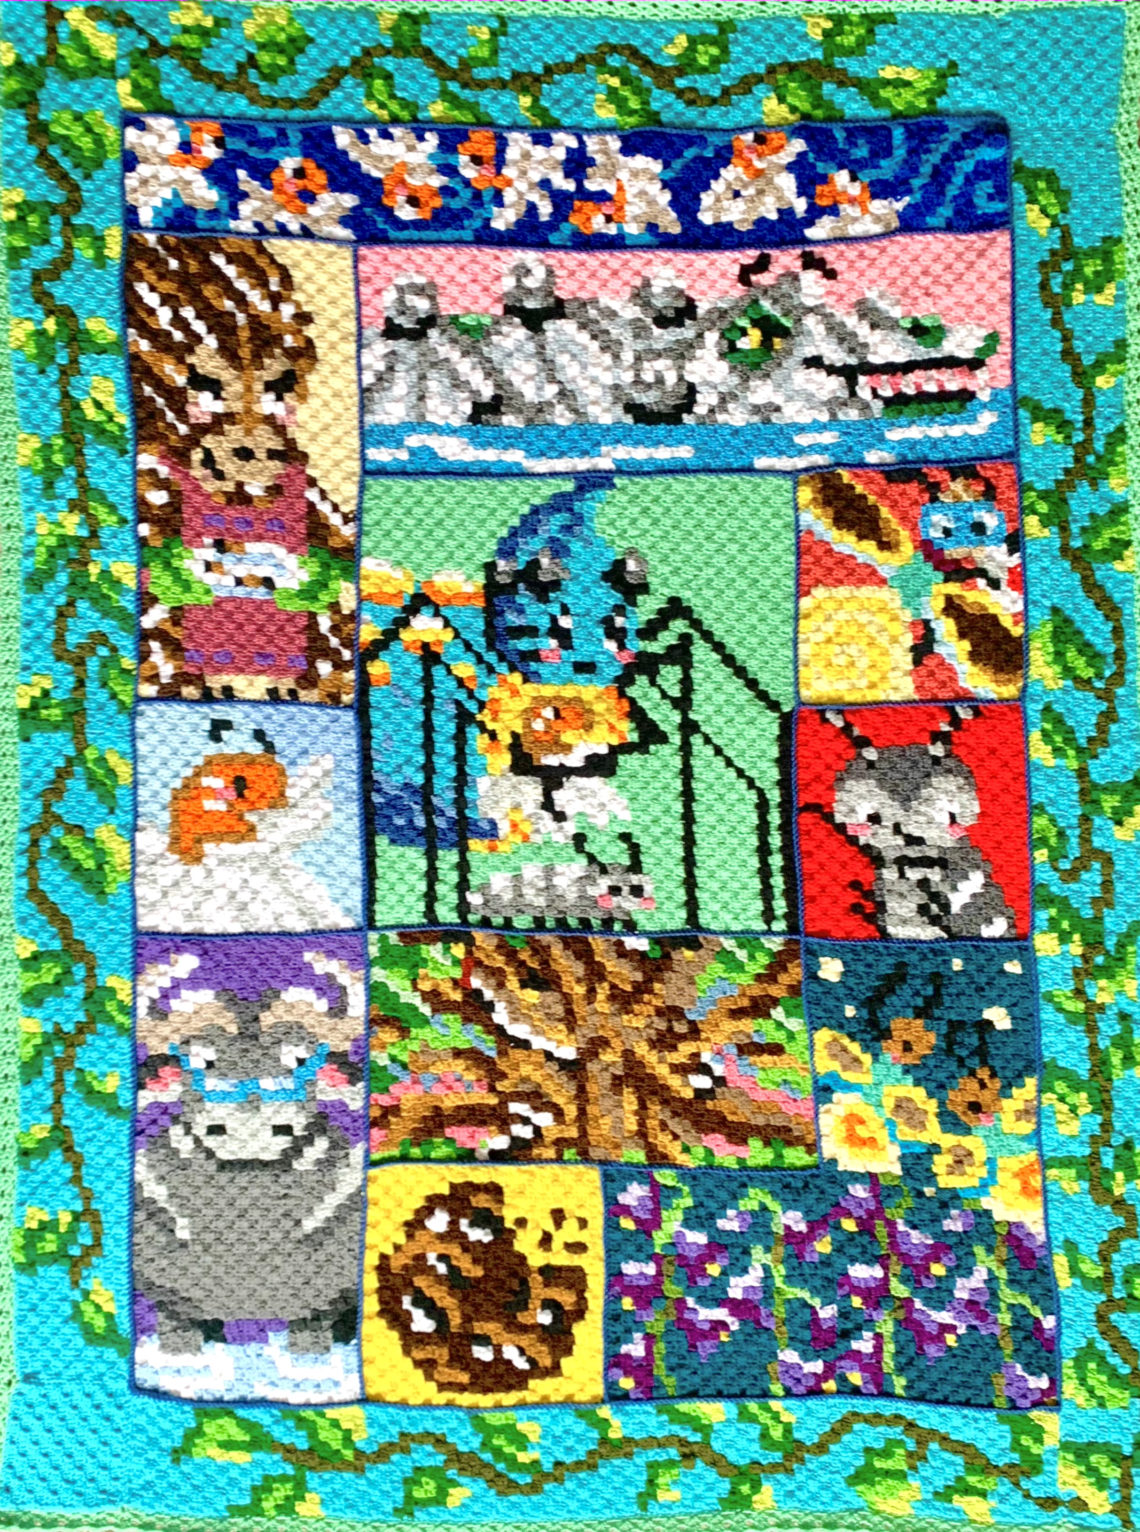
1. Lay them out in the order that you feel looks the best with the colors you’ve chosen. I like to make sure I don’t have two squares/rectangles with the same background color next to each other (if you chose to use different background colors from your stash). Also, decide if you want a vertical or horizontal blanket.

2. Using a seamless join, you will first connect the Bellflower Grove square to the Bouncing on the Bellflowers rectangle. Likewise, the ivy border connections around will also be done with the seamless join technique. See Seamless Join video on Ink & Stitches YouTube.

2a. Flip so the Bellflower square is closest to you, go down into the center of the V formed by the single crochet border stitch just before the corner-most stitch. Come up through the center of the V of the corner stitch. (This helps line up your stitches). Pull through leaving a 3” tail.
2b. Flip work so the rectangle, Bouncing on the Bellflowers, is facing you. Go down into the V of the single crochet border stitch on the square that is 20 squares up from the bottom (rectangles are 40 squares tall, squares are 20, this will align the square to make the backwards L), coming up on the stitch to the left, working towards the bottom of the piece. Pull through leaving stitches loose.
2c. Hop back across and do the same stitch on the single crochet border stitch to the left of the tail you left from the start, working from right to left. You will end at the bottom of the piece.
Go back and forth in this way for about 3” or so.
2d. Pull the loop from the first jump you made making sure not to pull the end out. This gives you a solid piece of yarn to grasp.
2e. Pull the loop on the right and the string on the left until all stitches are hidden on the inside.
Repeat 2c for another 3” and then pull again, until you finish invisible seam. Pull loop tail to tuck the loop back in.
2f. Tie off and weave in ends.
2g. Seamless join is now complete!
2h. Repeat same process when connecting the ivy border’s four sides together.
3. Using a single crochet seamed join, begin with the longest horizontal straight lines. For example, mine in the image below would be the lines in red. I work the lines from right to left. From the longest lines, I’d move to the next longest, i.e. below Cricket the crocodile (Covered in Hair), until you get to the smallest horizontal joins. Then I would move to the vertical longest joins and so on. See Seamed Join video on Ink & Stitches YouTube.
3. Place a slipknot on your hook of the color yarn you’ve chosen as your joining color. I chose the navy blue I used for some of Whimsy’s spots, but I’ve had other pattern testers go with black and other colors too for an equally brilliant blanket finish
4. Pinch together the two squares on the upper right hand side of your blanket. In my case, as you can see, that would be the Horizontal Ivy Border and the Wisps in the Wind rectangles.
5. Find the corner most edge stitches on either square and working through the right side (RS) of the bottom square and the wrong side (WS) through to the RS of the upper square, you will do a single crochet (sc) across to connect.
6. Grab your next rectangle and line it up.
7. Continue on with the same strand of navy blue yarn (or whichever color you chose to connect with). Grab the corner-most sc edges of the Lady Porcupine (or whatever the next square or rectangle is that you chose) and continue on working through the Wisps in the Wind.

8. Sc across.
9. Continue with the remainder of the row until you’ve finished your first connecting line. Fasten off.
Next Row:
- Get your next row lined up.
- Slipknot on hook. Sc across starting with a slipstitch to connect to the horizontal seam line you already made.
- Continue working connecting lines, starting with the longest lines (running from one side of the blanket to the other), and working your way through to the shortest joins (one square edge in length).
- Tie in the loose ends.
- All the joins are now complete!!!
Make your Border!
For the border we will be using the Iris Stitch Border, along with the same size H crochet hook. Work the Iris Stitch Border along with me on Ink & Stitches YouTube!
NOTE: You may need to up the crochet hook size to a larger hook for the starting single crochet foundation row if you notice your stitches are too tight and making the sides of the blanket bend or the corners pucker in weird ways instead of lying flat.
You are going to want to have the background color you used for the Whimsy + the Boys square in the center (or whatever color you decide to use). For me, this was Pistachio by Lion Brand Vanna’s Choice. I kept this border simple with just the one color. You can change colors on each of the rows if you’d like for a more colorful border. Since the Ivy Border is meant to be the thick part of the border, I kept my final edging simple.
V stitch (v st): [dc, ch1, dc] in same stitch.
Double V stitch (dv): [2dc, ch1, 2dc] in same stitch.
Round 1 (R1 – foundation round):
- Start in a corner with a slipknot on hook.
- Slip stitch to join.
- Ch1, [(sc, ch2, sc)] in each corner and sc in each outer stitch around.
- Slip stitch to join to first sc.
Round 2 (R2):
- Slip stitch in corner ch2 space.
- [Ch3 (counts as first double crochet), ch1, dc, ch2, v st] in same ch2 space from R1.
- *[Sk 3 sts, dv in next st] across, sk last 3 sts [v st, ch2, v st] in corner* repeat * to * 3 times, [sk 3 sts, dv in next st] across, sk last 3 sts, sl st to join in beg ch3 space.
NOTE: It’s okay if the last 3 sts you sk are 2 or 4 instead. No one will know that the count wasn’t perfect! 😉
Round 3 (R3):
- In same sp as you made your final sl st to connect in R2 [ch3, dc, ch1, 2dc], in next ch2 corner-most sp from R2 [dc, ch2, dc], dv in last ch1 space from R2 corner. Dv in every v and dv from R2 (the v sts were the ones in the corners of R2). In every corner-most sp from R2 [dv, ch2, dv], join with sl st to first ch3 sp.
- Repeat R2 & R3 until border is the desired width. I finished off after R3.
- Finally, tie in any loose ends leftover from completing the border.
Your Wishghan is Now Complete!

I’ve had so much fun making this Wishghan with you all!
When you post pics of your own blankets, don’t forget to tag me on social media so I can see them:
@jhwinterauthor
#WishghanCAL2021
![]()


You May Also Like
WISHGHAN CAL – Week #8 Lady Porcupine